Tuesday, August 20, 2013

House updates

Today Robert and I spent the day working in the sunroom at the new house (which we have named "The House Without Warning").

When we bought THWW the sunroom had this sort of pinkish/reddish industrial carpet with flecks of blue, yellow, green and red sprinkled throughout. It wasn't terribly attractive. And worse, it smelled awful. It smelled so awful, in fact, that after we'd bought THWW and it was too late I started to fear we'd never be able to get the smell out.

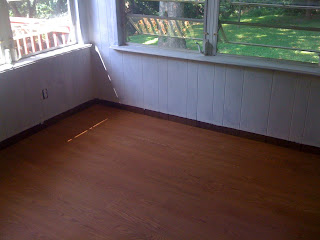
Our first step was removing the carpet. That revealed an ancient underlay with what appear to be cat urine stains. We removed the underlay (which, incidentally, gave Robert a rash from carrying it out), and discovered that the cat piss had in fact soaked through not just the carpet, but also the underlay and into the plywood subfloor.


Oy. Also visible in these pictures is the original wood paneling on the walls. I point this out because I a little bit regret not taking a picture of the carpet when it was in. Our "before" pictures are rather lacking.

At this point we didn't even know what we were going to do for a floor in the sunroom, but we obviously had to do something about the subfloor. We considered just sealing it all with something that would allegedly seal in the smell, which, in the absence of the carpet and underlay, was much fainter. But in the end we decided we couldn't risk that. I'm a super sniffer, and damn do I hate cat pee!

So we bravely began removing the subfloor. And we went to Home Depot and bought more plywood. Like big kids!


Happily, we discovered that the cat pee hadn't soaked all the way through the subfloor. Puzzlingly, we discovered that there was a subfloor under the subfloor. We briefly considered just removing the top layer of subfloor and calling it a day (and I must admit I was a fan of this seemingly easier approach) but our friend Stan, who was a carpenter for many years, advised against it. And since we're total home improvement greenhorns, we take the advice of those more knowledgeable than we pretty seriously.

So we prepared to lay a new top subfloor.


Bonus: in this picture you can see how the wood paneling is now covered in primer! You can also see the blinds that we aren't keeping.

It took a few more trips to Home Depot, but by 11am this morning we had the new top subfloor installed, and were ready to start putting down actual floor. At this point my enthusiasm for more floor work was so keen that I suggested we just coat the plywood in deck paint and call it a day.

But instead we pressed onward, and by 5pm our sunroom floor looked like this:


Not too bad, huh? Of course when we got home we pretty much collapsed, but rest assured that tomorrow we'll be back at it. Except that the "it" in this case is packing, because this is what our living room in our current house looks like.


Sadly, the rest of the house is far less boxy, and needs to straighten up, fly right, and start resembling the living room. Wish us luck!

Sunday, August 18, 2013

Oh, August.

This month has been insane. Some of the insanity has been fantastic, some of it...less so.

On the fantastic side: we bought a house! I'm super excited about it. It's on 1/2 acre, it has a lovely sunroom, 3 bedrooms, and some fantastic period details (it's a mid-century modern ranch).

In the mixed bag file we have the fact that the house needed some work. Nothing major, but hardwood floors needed to be refinished, entire house needed paint...those are nearly done, and very nicely too.

In the slightly stressful file are the things that remain undone: the floors in the sunroom need replacing (we've torn out the carpet and pad, and found that the plywood subfloor had cat urine damage. We've removed 1/2 of the damaged plywood, but the other half remains, and of course we haven't put down new plywood yet, nor the floor. Hell, we haven't bought the floor), the counters in the kitchen need replacing (not sure yet how that'll get done, it's well beyond our capability), both bathroom sinks need parts replaced, and we have packed about 1/8th of our possessions and the move day is Friday.

Quite honestly, I have no idea how this is all going to get done. And that's somewhat terrifying.

Additionally, I need to finish converting my syllabuses to the new class timeframe. And our car needs its annual inspection. That's this week too! Furthermore, I've got a bit of knitting work that needs done (contract and gift work, so there's a timeline), and Zion has been having some health problems, which (it appears) are going to require a fair bit of time and brainpower to unravel.

I just...yeah. I don't like to use the blog to complain, so I'll try not to! And with a bit of luck a lot of this will be cleared up in a week or so. Please say a prayer for me/send me good energy/come help me pack!

Wednesday, July 24, 2013

Bustle

Some of my friends in India recently introduced me to the blog 108 Ways to Wear a Sari, and I've been having so much fun looking at all the different drapes and styles! There are traditional and modern wraps from all parts of India and pop culture.

But you know what's even more fun then browsing new drapes and styles? Trying new drapes and styles!

Since I'm a pretty crappy pleater, as you may recall, I decided to start simple, and went with a drape that turns the sari into a skirt...and not just any skirt...a skirt with a bustle! It's like a steampunk sari.

Let me just pause here and say that I began regretting how few saris I own pretty much since the first day we were back in New York. And now I regret it even more! I need more cotton saris! Need them! Send help!

Anyway, back to my bustle-sari-skirt. I did it! And it looks really pretty awesome, I must say. And it's comfortable. My only real gripe is one I have with every drape I've tried, which is that the bulk of the sari (from tucking it in at the waist band mostly) gives me an extra bit of padding on my stomach and makes it protrude in a rather odd way. That look is even more pronounced in these pictures, because I unwisely tied my petticoat in front. I have no idea what I was thinking, and in fact only realized it when I started typing this here complaint. Onwards to the crappy self portraits taken with an iPhone in the bathroom!

From the front, it looks like a pretty simple (but super cute) layered skirt, right? (and see what I mean about the extra padding?)


But then: the side view!


And the awkward "take a picture of your own back in the mirror"! Personally I think the awesome bustle is well worth it. But still. Awkward.


So there you have it...my current sari love. What do you think, can I rock this look at work? 

Tuesday, July 9, 2013

Bun

One of my kids' favorite cuisines is Vietnamese. And (to borrow a phrase from Zion), I can't blame them! It's delicious. Actually, the very first place we took Liel out of the house after she was born was our favorite Vietnamese restaurant in Lower Manhattan.

I was going to put a picture of that event up, but I can't find it. And I looked for upwards of two minutes! So you'll just have to imagine it-- it was terribly cute. And delicious.

Anyway, when we moved up here to Rockland County we knew we had to find a good Vietnamese restaurant. And boy did we get lucky, cause at the time, there was exactly one Vietnamese restaurant in the entire county! The lucky bit was that it was also delicious...and that the people who run and own it are so, so nice. We've gone there frequently over the years, and they always give us great food, and remember that we don't want peanuts on anything, even though we, responsible parents of allergy kids that we are, usually forget to remind them.

But sometimes you want Vietnamese food, and you don't want to drive to Spring Valley. And that's where this post comes in, because a year or so ago I started making bun, Vietnamese rice noodle salad, at home. It's easy, super fantastically delicious, and as Liel says, the best part is that it is FULL of fresh vegetables (I know, I'm as surprised as you are. My little carnivore, singing the praises of fresh veggies? Awesome!).

The recipe is based on one from Cook's Illustrated.

Here's what you need:

--rice vermicelli (8oz will feed the 4 of us, with no leftovers, but everyone full)
--lettuce
--fresh mint
--carrots
--cucumber
--fresh basil
--fresh cilantro
--boneless, skinless chicken thighs
--brown sugar
--white sugar
--lime juice
--fish sauce
--grapeseed oil
--garlic
--almonds

Here's what you do:

--Slice the chicken thighs into thin, smallish bits
--Mix equal parts fish sauce and brown sugar, plus 1.5x's as much grapeseed oil, in a bowl (for about 8oz of chicken I use 1T each of fish sauce and brown sugar and 1.5 T oil)
--Put the chicken in the sauce you just made and let it marinate a while. Doesn't need to be super long...I think I left mine for 30 min today.

--Cut the carrot into matchsticks, or something that vaguely resembles a matchstick. Seed the cucumbers and cut them into matschstick-ish bits too.
--Mix 1/3 c warm water, 2 T sugar, 4T lime juice, and about 1/4 c (or a bit more) fish sauce in a bowl. Add a crushed clove of garlic or two, and if you're not cooking for my daughter, a chopped, seeded jalepeno (or part of one).
--Pour a bit of this sauce on the cukes and carrots. Add a few tablespoons of chopped almonds, stir, and set aside.

--Boil water.
--Add rice vermicelli, and turn of the flame and put the lid on. Let it sit about 8 min, until the noodles are tender.
--Drain the noodles and rinse in cool water.

--Heat a little oil in a big skillet. Cook the chicken.

Here's how you assemble it:

--Put some lettuce in a bowl. You can make one big bowl or several small ones.
--Top the lettuce with the marinated veggies, and lots of fresh, chopped basil, cilantro, and mint.
--Put the rice noodles on top of the veggies.
--Put the chicken on top of the noodles
--Pour the remaining lime sauce on everything.

Then, eat!

It's really quite easy, and as an added summer bonus, requires very little time with the flame on. And Liel likes to help chop the veggies, and everyone likes to eat it. It's full of win!

Monday, June 3, 2013

Winner!

I learned something today: I don't like random drawing give-aways. Even though I used a random number generator to determine who'd get the fingerless glove prize, I still felt sad! I want to give fingerless gloves to all of you! Kinda like that old Coke commerical, but less detrimental to your health.

So, do keep you eye on the blog from time to time, cause I'll do other give aways, but they'll be of the contest variety :)

In the meantime, the RNG chose: Comment number 3!


Comment number 3, come on down!!

Mel, I'll mail these out to you in the next day or two. Enjoy! 

Wednesday, May 29, 2013

You know I rock because I'm wearing wool!

I haven't had a give away on the blog in ages and ages-- mainly because I wasn't really using the blog anymore. But India got me back to it, and I'm thinking to try to keep it up for a while. And since we could all use a little more love in our lives, I figured to combine the two and give away some knitting on the blog! Plus, now that summer is here, what better time than to give away something warm, hand knit, super fly, and made of wool?

No better time. Clearly. You'll be preparing for the cold (winter is coming, amiright?), looking cute, and making someone smile. 

Here's what's up for grabs: a pair of fingerless gloves, knit by me from soft, squishy merino wool yarn in a color that's a cross between orange juice and gold-- in other words, these gloves are made of happy. 

They're perfect for cozying up to a mug of coffee or tea!


Or, because they are fingerless, you can write in your brand new, blank journal without fear of cold hands! Also great for reading books, playing video games, posting on Facebook, watching cat videos, or otherwise wasting time on the interwebs. And remember: summer time is overly air-conditioned time! 


Here they are in all their glory, along with my fantastic props.


So now you know what I'm offering. But how, HOW do you get them??

It's simple, really. Leave a comment (by, say, June 2) telling me who you'd like to give these gloves to, and telling me why that person is awesome/needs some love/should be cheered up/is in desperate need of fingerless gloves. Assuming I have more than one comment, I'll probably use a random number generator to choose a winner. And then I will pop them in the mail to that person, and, because you were such an great friend to nominate them for such a nommy prize, I will send you a matching pair. Because I made two pairs :) And because I love you. 


Thursday, May 23, 2013

Rainy farmer's market days always get me down

Mainly because this California girl still has a deeply ingrained dislike of being outside when there's water falling from the sky. It's not right, man. Water from the sky = take shelter.

But sadly, water falls from the sky pretty frequently in these parts, and lately it's been doing so on Thursdays, which are farmer's market days in our village. Of course we're still stuck at about 3 farmers at our market (dwarfed by the 10-15 non-farmers who sell various items at the market) but that's not my point at the moment.

My point is: I need more rhubarb. And the place to get it is the farmer's market. And it's rainy again. But my need for rhubarb will surely prevail and I will brave the weather and walk downtown. Or possibly I'll beg Robert to go and slay the mighty rhubarb and bring me back its carcass, a deed which would earn him many kisses and admiring sidelong glances.

And why is my need for rhubarb so desperate? Well, I'll tell you. Aside from the fact that rhubarb is one of the tastiest plants known to grow on this earth, I also make a delicious syrup from it. And that syrup is the basis of my favorite late spring/early summer cocktail.

Rhubarb Awesome

1 part gin
1 part rhubarb syrup
1/2 part lemon juice
basil leaves

Put all of the ingredients in a cocktail shaker with some ice. Shake it vigorously. Pour into a glass (be sure to include the basil leaves!). If you're making it for me, include the ice as well. Glory in the joy that is the Rhubarb Awesome.